Are you ready to embark on your furniture painting journey? Look no further than the essential starter kit that will have you transforming your old pieces in no time! This comprehensive kit includes all the tools and materials you need to get started, such as paint brushes, sandpaper, primer, and paint. Safety is our top priority, so we’ve also included protective gear like drop cloths and tack cloth to ensure a safe and clean painting experience. With the handy paint trays and stir sticks, you’ll be able to mix and apply your chosen paint colors effortlessly. Get ready to unleash your creativity and give your furniture a fresh new look with this essential starter kit!

Key Takeaways
- Understanding the different types and sizes of paint brushes needed for various areas and details in furniture painting.
- Importance of using the correct grit size of sandpaper and employing proper sanding techniques for achieving a smooth surface.
- Choosing the right primer based on the furniture material and the benefits it provides in terms of adhesion and protection.
- Considerations for selecting the appropriate type of paint, color, and finish to achieve the desired result in furniture painting.
Paint Brushes
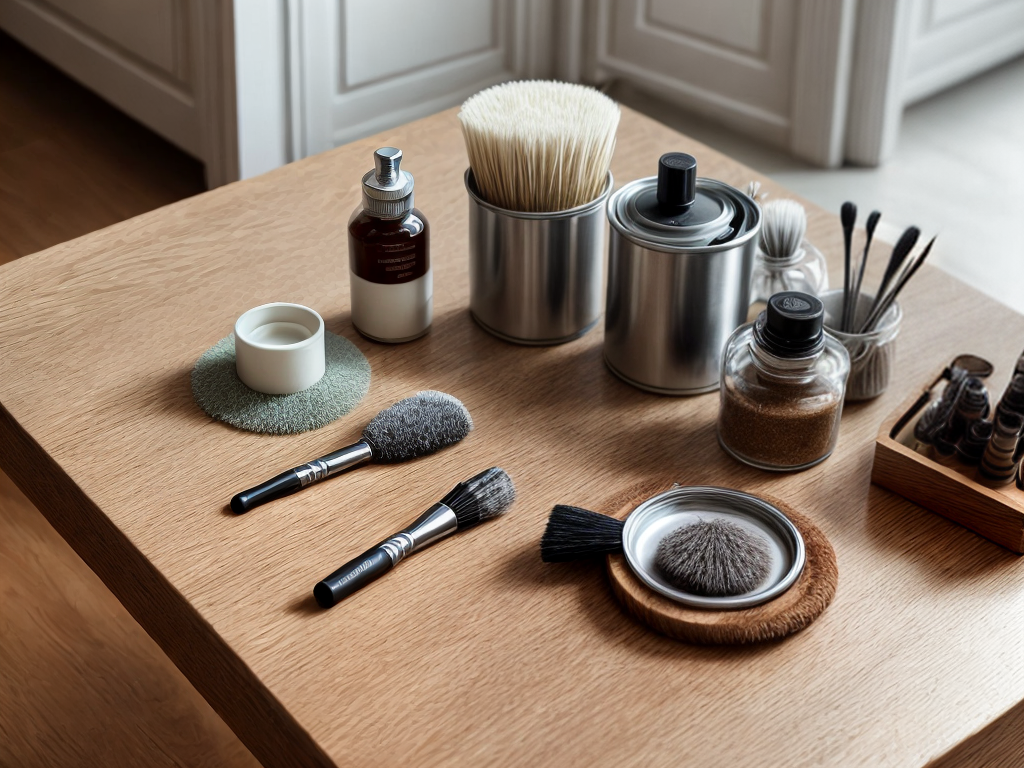
- I always recommend beginners to start with three different sizes of paint brushes. When it comes to furniture painting, having the right brushes is crucial for achieving a smooth and professional finish. There are different types of paint brushes available, each designed for specific purposes. The most common types include flat brushes, angled brushes, and round brushes. Flat brushes are perfect for large, flat surfaces, while angled brushes are ideal for corners and edges. Round brushes, on the other hand, are great for intricate detailing. Proper paint brush care is essential to ensure their longevity and maintain their performance. After each use, make sure to clean them thoroughly with soap and water, removing all traces of paint. Store them in a cool, dry place to prevent bristle damage. With the right brushes and proper care, you’ll be well-equipped to tackle your furniture painting projects with confidence and safety.
Sandpaper
When it comes to sandpaper, there are three key points to consider: grit size, sanding techniques for preparation, and using it for finishing touches. Understanding the different grit sizes will help you choose the right sandpaper for the job. Proper sanding techniques are crucial for achieving a smooth and even surface before painting. Lastly, sandpaper can also be used for adding texture or distressing furniture for a unique look.
Grit Size Explained
I always start my furniture painting projects by understanding the importance of using the right grit size when sanding, with a focus on achieving a smooth and even surface. Grit size selection is crucial as it determines the aggressiveness of the sandpaper. For safety purposes, it is essential to choose the appropriate grit size for different finishes. When dealing with delicate finishes like lacquer or veneer, it is best to use a finer grit, around 220 to 320. For rougher finishes or surfaces with multiple layers of paint, a coarser grit, like 80 to 120, is more suitable. By using the right grit size and following proper sanding techniques, you can ensure a successful painting project while maintaining safety.
Sanding Techniques for Prep
To properly prepare your furniture for painting, I begin by explaining the essential sanding techniques using different grit sizes. Sanding is an important step in the painting process as it helps to remove imperfections, smooth the surface, and create a better adhesion for the paint. One technique you can use is wet sanding, which involves soaking the sandpaper in water before sanding. This helps to minimize dust and provides a smoother finish. Another technique is hand sanding, where you use your hand to apply pressure while sanding. This allows for better control and precision. Remember to always wear protective gear, such as gloves and a mask, to ensure your safety while sanding.
Finishing Touches With Sandpaper
To achieve a polished and smooth surface, sandpaper is an indispensable tool for adding the finishing touches to your furniture painting project. When it comes to sanding, it’s important to choose the right sandpaper grades. For a beginner, starting with a medium or fine grade sandpaper is recommended. These grades are not too abrasive and will help you achieve a smooth finish without damaging the wood. When using sandpaper, always sand in the direction of the wood grain to avoid scratches. Additionally, make sure to sand evenly and apply even pressure to avoid uneven surfaces. Remember to wear safety goggles and a dust mask to protect yourself from any particles that may be released during sanding. By following these sanding techniques and using the right sandpaper grades, you can achieve a professional-looking finish for your furniture painting project.
Primer
One essential item in my furniture painting starter kit is a primer. When it comes to painting furniture, primer is a crucial step that should not be skipped. It helps to create a smooth and even surface for the paint to adhere to, ensuring a long-lasting finish. When choosing a primer, it is important to consider the type of furniture you are painting. For wooden furniture, a wood primer is recommended, while metal furniture requires a metal primer. Additionally, consider the grit size selection when sanding your furniture before applying the primer. A finer grit sandpaper, such as 220-grit, will help to remove any imperfections and create a better surface for the primer to adhere to. Remember, using a primer not only improves the appearance of your painted furniture, but also provides a protective barrier for the underlying surface.
Paint
Now let’s move on to the next essential item in my furniture painting starter kit: applying the paint. When it comes to painting furniture, there are a few techniques that can help you achieve the best results. First, make sure to choose the right type of paint for your project. Water-based paints are a popular choice as they are easy to clean up and have less odor. Oil-based paints, on the other hand, provide a more durable finish. When it comes to color selection, consider the overall aesthetic you want to achieve. Neutrals like white or gray are versatile and can easily match different styles, while bold colors can make a statement. Remember to always work in a well-ventilated area and wear protective gear like gloves and goggles to ensure your safety.
Drop Cloths
When it comes to furniture painting, one of the essential items you’ll need is a drop cloth. Choosing the right material is important to protect your floors and surfaces from paint splatters and spills. Proper placement and coverage are also crucial to ensure that your work area is fully protected throughout the painting process.
Choosing the Right Material
I always recommend using at least two durable canvas drop cloths when choosing the right material for furniture painting. Drop cloths are essential to protect your floors and furniture from paint splatters and spills. They provide a barrier between your work area and the surrounding surfaces, ensuring a safe and clean environment. When selecting drop cloths, look for ones made from heavy-duty canvas material that can withstand the weight of furniture and resist tearing. Canvas drop cloths are reusable and easy to clean, making them a practical choice. Remember to secure the drop cloths properly to prevent any tripping hazards. By investing in high-quality drop cloths, you can paint with peace of mind, knowing that your furniture and surroundings are protected.
Proper Placement and Coverage
To ensure proper placement and coverage when using drop cloths for furniture painting, it is important to securely position them in the work area. This not only protects the surrounding floor or surface, but also prevents any accidental spills or drips from damaging your furniture or other belongings. When choosing the right color for your drop cloth, opt for a lighter shade that allows you to easily spot any paint splatters or spills. Proper technique is crucial when laying down the drop cloth. Make sure to unfold it completely and smooth out any wrinkles or folds to create a flat and even surface. Additionally, secure the edges of the drop cloth with tape or weights to prevent it from shifting or moving during the painting process. Taking these precautions will help you achieve a clean and well-protected work area.
Painter’s Tape
With Painter’s Tape, I can easily create precise lines and protect certain areas while painting furniture. Painter’s tape is a versatile tool that offers many benefits for beginners like me. Firstly, it helps me achieve clean and straight lines, ensuring a professional finish. Secondly, it acts as a barrier, preventing paint from bleeding onto adjacent surfaces, such as walls or hardware. To make the most of painter’s tape, it is important to follow a few tips. Firstly, ensure that the surface is clean and dry before applying the tape. Secondly, press down firmly to create a tight seal and prevent paint from seeping underneath. Lastly, remove the tape while the paint is still wet to achieve sharp edges and avoid peeling. By following these guidelines, painter’s tape can make my furniture painting projects easier and more successful.
Tack Cloth
When it comes to furniture painting, using a tack cloth is essential. Not only does it help remove dust and debris from the surface, but it also ensures a smooth and clean finish. However, if you don’t have a tack cloth on hand, there are alternative methods you can try to achieve similar results.
Why Use Tack Cloth
Using tack cloth is a crucial step in furniture painting for beginners, as it helps to remove any dust or debris from the surface before applying paint. It is important to ensure that the surface is clean and free of any particles that could affect the finish of the paint. Tack cloth is specifically designed for this purpose, as it has a sticky texture that adheres to dust and debris, effectively trapping them and preventing them from spreading or contaminating the paint. While there are alternatives such as lint-free cloths, tack cloth is preferred because it is specifically designed to remove fine particles. When comparing tack cloth to lint-free cloth, tack cloth is more effective in picking up and trapping dust, ensuring a smoother and cleaner paint finish. Safety is paramount when painting furniture, and using tack cloth is a simple yet effective way to achieve a clean surface before painting.
Tack Cloth Benefits
Tack cloth offers several benefits when preparing furniture for painting. It is a sticky cloth that helps remove dust, lint, and other particles from the surface of the furniture. One of the main benefits of using tack cloth is that it ensures a smooth and clean surface for painting. It effectively picks up any loose debris that may be present, preventing it from interfering with the paint application. Tack cloth is also easy to use, simply unfold it and wipe it gently over the surface. It is important to note that while tack cloth is highly effective, there are alternatives available such as microfiber cloths or lint-free rags. However, tack cloth remains the preferred choice among professionals due to its superior ability to remove particles and ensure a flawless finish.
Alternative to Tack Cloth
To achieve a flawless finish when preparing furniture for painting, I prefer using an alternative to tack cloth. While tack cloth is commonly used to remove dust and debris, there are alternative options that can be just as effective. One DIY technique is to use a microfiber cloth or a lint-free cloth dampened with water or a mild cleaning solution. This will help to remove any dirt or grime from the surface of the furniture without leaving behind any residue. Another option is to use a soft brush or a vacuum cleaner with a brush attachment to gently remove any dust or particles. These alternative methods are not only safe but also cost-effective, making them ideal for beginners who are looking for budget-friendly options.
Paint Trays
As I prepare to paint furniture for the first time, I find it helpful to have a paint tray ready to hold and distribute the paint. Choosing the right paint color is essential for achieving the desired look, so having a paint tray makes it easier to mix and blend different shades. Additionally, proper ventilation during painting is crucial for safety. A paint tray allows me to minimize the amount of paint I use, reducing the risk of fumes and odors in the air. With a paint tray, I can control the amount of paint I apply to the furniture, ensuring a smooth and even finish. It also helps me avoid spills and messes, keeping my work area clean and organized. So, when painting furniture, don’t forget to have a paint tray handy!
Stir Sticks
When I am preparing to paint furniture for the first time, I find it important to have stir sticks on hand to properly mix the paint. Stir sticks are essential tools that help ensure the paint is well-mixed, resulting in a smooth and even application. To use stir sticks effectively, I recommend using a back-and-forth motion, scraping the sides and bottom of the paint container. This technique helps incorporate any settled pigment and prevents streaks or uneven color. After each use, it is crucial to clean the stir sticks thoroughly. Simply wiping them with a cloth or rinsing them with water is not enough. Instead, use a solvent such as mineral spirits or paint thinner to remove any dried paint. Cleaning stir sticks properly not only extends their lifespan but also prevents any residue from contaminating future paint projects.
Protective Gear
My essential starter kit for furniture painting includes a sturdy pair of gloves. Safety should always be a top priority when working with paint and other chemicals. Gloves protect your hands from harmful substances and prevent any potential skin irritations or allergic reactions. Additionally, it is important to consider using tack cloth alternatives and primer for added protection and better results. Tack cloth alternatives, such as lint-free cloths or microfiber towels, can effectively remove dust and debris from the surface of the furniture before painting. This ensures a smooth and clean surface, allowing the paint to adhere properly. Primer is also crucial as it helps to seal the surface, prevent stains or bleed-through, and create a smooth and even base for the paint. Remember, investing in proper protective gear and using the right tools will guarantee a safe and successful furniture painting experience.